Installing And Configure BindIP DNS Updater as a Service on Linux
PostedJanuary 12, 2025
UpdatedJanuary 12, 2025
ByAdmin
This tutorial will guide you through installing the BindIP DNS Updater as a service on a Linux system. Follow the steps below to set up the service and ensure your hostname stays updated with the latest public IP address.
1. Download the BindIP Updater Package:
wget https://bindip.net/public/updater/bash/bindip-latest.tgz
2. Create a Directory for BindIP:
sudo mkdir /opt/bindip
3. Move the Downloaded Package to the Directory:
sudo mv bindip-latest.tgz /opt/bindip
4. Navigate to the BindIP Directory:
cd /opt/bindip
5. Verify the File is Present:
ls
6. Uncompress the Package:
sudo gzip -d bindip-latest.tgz
sudo tar -xvf bindip-latest.tar
7. Delete the Compressed Archive:
sudo rm bindip-latest.tar
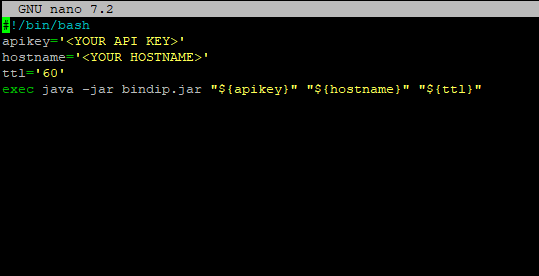
8. Configure the BindIP Script:
Open the script to input your API key and hostname:
sudo nano bindip.sh
Replace placeholders with your API key and hostname. Save and exit (Ctrl + O, Enter, Ctrl + X).

9. Make the Script Executable:
chmod +x bindip.sh
10. Create a Logs Directory:
sudo mkdir /opt/bindip/logs
sudo chmod a+rwx /opt/bindip/logs
11. Create a Service File for BindIP:
sudo nano /usr/lib/systemd/system/bindip.service
Add the following content to the file:
[Unit]
Description=BindIP IPv4 Updater
After=network.target remote-fs.target nss-lookup.target
Wants=network-online.target

[Service]
Type=simple
PIDFile=/var/run/bindip.pid
User=<YOUR LINUX USERNAME>
Group=<YOUR LINUX GROUP>
ExecStart=/usr/bin/bash /opt/bindip/bindip.sh
WorkingDirectory=/opt/bindip
Restart=always
RestartSec=5
StandardOutput=syslog
StandardError=syslog
SyslogIdentifier=bindip

[Install]
WantedBy=multi-user.target
Save and exit (Ctrl + O, Enter, Ctrl + X).
12. Reload the systemd Daemon:
sudo systemctl daemon-reload
13. Start the BindIP Service:
sudo systemctl start bindip.service
14. Enable the Service to Run at Boot:
sudo systemctl enable bindip.service
